Who is this for
The UCSBs website was created by web developers using Drupal. Drupal is a CMS, i.e., content management system, for developing the framework for large websites. Once the framework is complete, the content editors can make the pages for the departments.
For Instructional Development, the actual content is written by whomever in the area is responsible for that area. Once the content is written, it needs to be put on the website in a way that is conducive to the users' needs. That is for the content editors, and this instruction manual is for ID's content editors.
How to use this book
This book is meant to be an example of what you need to do and what you can do. The need-to-know items will be explained in this section. These will be the basic rules for creating a page. The other sections, such as Galleries and Embedding, will show the options of what you can do for that choice. These other sections will start with a paragraph explaining the advantages/disadvantages, uses, and things to look out for when trying to duplicate it on your page. But in most cases, to get the same effect on your page, you can go into edit mode on that page where the example is and see what settings are used that you can use.
To get instructions on all of the available options, go to the Universities' Web Theme User Guide.
How to create a new page

When in edit mode, at the top you will see a menu. Click on the Content tab to see all of the content on the site. Here you will have the option to create a new page and search the existing pages to make changes. (although for most changes, including content changes, find the page on the web site and edit there)
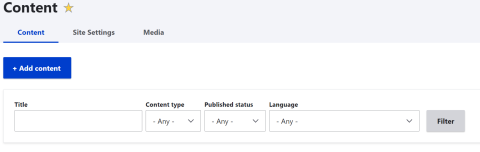
Click the Add Content button to create a new page. Note that the filter, i.e., search function is most useful for find many pages, e.g., to find all of the Overview pages on the site, or to use the content type to find a particular type of page, e.g., event. Once you add content you will see the four different types of content that you can add:
- Basic Page. This is the option that you will use the most as it will create a page on the ID web site that you will be able to tell where you want the page to show up on the site's menus.
- Book Page. Books are self contained pages on a specific topic. See the section on books to learn how to create a book. If you do create a book make sure to tell what book the page belongs. This is found at the upper right of the top of the book.
- Event. The events are taken from Shoreline and shown on the Events page. It is found at the top right blue menu on every page.
- News. At the moment we do not have a specific news section to show these pages.
Note that a Basic Page can be added to a book. But a book page does not have Menu Settings or Meta Tags available. So if you are not sure if it is going into a book, make it a Basic Page.
Enter the menu settings for where you want the page to show:
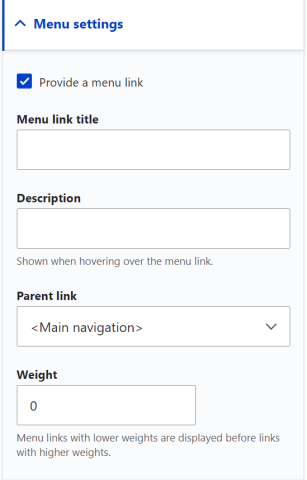
The menu link title will be what shows up on the web site menu. The description is what will show when the mouse hovers over the title. The parent link drop-down will allow you to choose where the page will show up. The weight can prioritize where on the menu the page link will show. It goes Left or Top to Right or Bottom for lowest to highest weight.
See the Meta Tag page in this book to see if you want to find out more about meta tags. But when creating the page choose a good and descriptive title page, as that will automatically be looked at by the SEO, search engine optimization. And add a good description as the search engine may use this when the page is shown up on a search page. Create the description with the desired viewer in mind. E.g., if it is probably a student word it so that the student would find it useful. Same for TAs and Professors.
When creating new pages, ALWAYS
1: set the width to 10 or less when making columns. Leaving it at 12 can cause some problems reading on certain devices. However, when breaking the width up into columns, the total width of all columns should be 12. i.e., two columns have 6 and 6 or 4 and 8, adding up to 12. You can have more than two columns but don't make it too busy. Mobile devices, e.g., phones and tablets, will automatically stack columns if needed on a smaller screen.
2: All links to pages within the ID website should be made relative. A relative link tells the browser how to get to the page while staying on the website. The links that most people are used to seeing are called Absolute links.
Absolute: https://id.ucsb.edu/classroom-services-office
Relative: /classroom-services-office
The browser assumes the https://id.ucsb.edu, which will change the URL to absolute and go there whenever the link is activated. A relative link will not break if the website is moved, as we did when we made the website live, so on the admin side, it makes it easier to do maintenance. But, for our purposes now, the relative link is shorter and easier to type in without making a mistake.
3: All links to pages outside of our website need to be external links. To do this, select Off-Site Link from the text formatting drop-down menu.
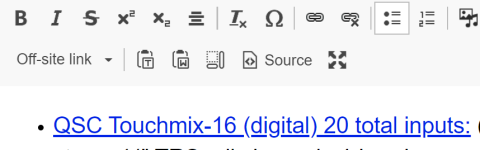
This will give you a link that shows the user they will leave our site if they click on it:
Structure
Since we are only concerned with editing pages, here we will only look at how to structure the page to get the design we want. The overall structure is:
- Page
- Blade
- Column
- Blade
- Column
- Column
- Column
- Blade
- Column
- Blade
Where every blade needs at least one column but can have more. The blade is like a chapter in a document. It is used to separate content when the content changes. For instance, here I have created Blades for "How to use this book", "Structure", and the embedded document. The columns are good for organizing information within the blade. So "How to use this book" has only one column because it is just text. "Structure" however has multiple columns to display the information in a way to be, hopefully, easier to understand. Finally the embedded document has only one column to embed the document into.
Blade
A blade is a good way to organize similar information on a page. Since the blade can be moved within the page or deleted, having all the information that goes together in one place is useful. A blade is automatically12 wide. i.e., the width of the page in the browser is broken up into 12 units. But as the browser window gets smaller, the blade width may decrease. That is why viewing a page on a phone may stack columns within the blade vertically, whereas, on a computer screen, they may be side by side.
Blade width on a computer screen = 12, so two columns of 6 each will show side by side. However, if the screen size is small enough, the blade will adjust to a smaller number of equal divisions. So the blade might be only 10 units wide. Then there will be a 6-width column over the second 6-width column. See the explanation for the columns below and think of those columns behaving in a blade.
Column
The column is how to structure the information within the blade. The columns can be set for different widths and will be next to each other unless the widths are over 12. So 6,6 will give 2 side-by-side columns while 4,4,4 will give 3 side-by-side columns. But 8,6 will give an 8 wide column stacked over a 6 wide column because 8 + 6 is over 12 maximum. Columns of text should be 10 max, eliminating certain issues on certain devices with edge-to-edge text. Images + text columns can be 12. This is to make it easier to read on all screen size situations.
Notice that above I used two columns for different reasons. The first had the outline for a structure of a page. But that would have left a lot of empty space to the right if I had left it as one full-width column. So I made the column thinner and made the description column go next to it. The second I put two columns side by side to make it easier to compare and contrast a blade and a column.
Website Guide PDF
The original guide that this manual has clarified and expanded on.